Sunday, December 23, 2007

Ubuntu

In an effort to use OpenGL to its full potential, and a feature that is unique to OpenGL over its main competitor DirectX, I have decided to create a non windows version of Decade. Over the weekend I downloaded Ubuntu which is a free community developed, linux-based operating system.

Instead of making my desktop dual boot, I decided to try and use Microsoft Virtual PC, which is also free to download. It was a very easy to create the virtual PC, virtual hardisk and install Ubuntu. I can now access my Ubuntu installation from within my windows environment getting the benefits of both systems.


It took a little effort to get networking enabled, my router requiring some setting changes however once this was complete it was again a simple process to connect over the local network and access the shared drives on my Windows PC. With this setup I hope to use the same source base for Win Decade and Ubuntu Decade.

My first job after leaving university was in a HPUX environment however being a number of years ago I have forgotten allot of the basics. This morning I created the obligatory "Hello World" C++ program, but am having problems building OpenGL and SDL projects.

Saturday, December 15, 2007

Decade Meets ODE

Time yet again ticks by. No matter now much I try I can't stop it. As you can see Novermber was a quiet month in the life of Decade. Due to personal reasons I did not have much if any time to program, however last week I returned to Decade and decided that it was long overdue to add some physics to the engine.

Having messed around with ODE (Open Dynamics Engine) a few years ago I decided that I would start with this free physics engine. I am trying to use the same approach in adding the physics as I did with the graphics. I have implemented an extrapolation layer between the game engine and the physics engine with the hope that in the future I can add support for other physics engines without having to change too much of the game code.

Refreshing myself with the theory of ODE last week I have now started to modify Decade. Up to now all transformations, rotations etc.. in Decade were stored as Eulars. ODE rotations are matrix based so rather than have converter functions to change between Eular->Matrix and Matrix->Euler I modified the Decade core so that each object builds its own Model View Matrix. The Projection and View matrices are also build and handled by Decade. Although a little more complicated to code and read this approach does have some advantages. For an object which is static in the world its matrix can be built once, reused time and time again and doesn't have to be updated until the object moves. Using the glRotate, glScale and glTranslate functions this matrix was built for each object every frame.


Now that the basics of ODE have been added I will continue on this course building my Physics Layer. I will create some simple rag doll physics or a vehicle which will introduce me to the topic of joints.
After basic physics is added to Decade I really must invest some time to complete my to do list of improvements on current features. This includes
  • Properly fixing cracks in terrain
  • Priority Rendering Queue
  • Octree V Quadtree
  • ROAM Terrain
  • Finish Shadow Volumes and Parallel Split Shadow Maps

and after that I need to continue with my future to do list

  • Scriptable Particle System and Editor
  • Planet Generation
  • Some small tech games (Golf, racing etc...)

Tuesday, October 30, 2007

Atmospheric Scattering

At long long last I have got a grip of atmospheric scattering. Decades implementation of atmospheric scattering is based on Sean O'Neill's amazing research. In the video below you can see the sun rising in the sky as the camera moves around the planet. The word planet is used with grace as the planet is simply a smooth sphere which was procedurally generated with recursive subdivision. (See Post below). Close to the end of the video the rendering switches to wire frame and you can see the planet subdividing by another level.


As always there is a list of improvements to make. The planet is currently rendered in software, each face rendered separately. There is also no culling. Adding hardware acceleration and efficient culling should greatly improve performance. The subdivided implementation of the sphere allows easy culling of vast numbers of faces with a few checks.


I am also going to look more detailed at realtime fractal terrain generation, possibly with Perlin Noise so as I dubdivide the planet as the camera gets closer the result will be a details, rich looking terrain.

Wednesday, October 24, 2007

Procedural Sphere

While implementing my Sky Dome for atmospheric Scattering a number of issue quickly became noticeable. A sphere generated using the OpenGL function gluSphere or loaded from a mesh file had vertex compression at the poles. This usually causes texture compression/distortion which is naturally very undesirable.

To maintain Decade's procedural capability and to remove the issues with the previous implementation I created my own Sphere function by recursively subdividing a cube until the required resolution was achieved.

Below the two solutions can be seen side by side. On the left is the Sphere created with gluSphere or loaded from a file. The vertex compression is immediately obvious. The size of the face depends on which segment it exists, with faces getting smaller closer to the poles. On the right is my procedurally generated sphere. As you can see there is no vertex compression at the pole. In fact no pole is visually obvious. Due to the subdividing nature of the algorithm each face in the sphere is the exact same size.


I believe I may have achieved allot more than just creating a sky dome with this implementation. Creating a universe with procedural planets has always been on the wish list for Decade but I never knew where to begin. The recursive subdivision appears to be an ideal solution for this. It has level of detail and efficient culling properties automatically built in.

The level of the quad tree rendered defines the level of detail of the planet. Since the root of the planet is 6 quads, it is easy to bounds check these against the frustum and quickly remove unseen areas of the planet and the same process can be repeated for each of the child levels of the quad tree.


By using the above algorithm along with some height maps I believe rendering a full planet should be possible. I look forward to the day when I can roam a planet in Decade then jump in a space ship, fly away and land on another planet.

Sunday, October 21, 2007

Oil Painting

For another personal project (web based) I have worked on some image processing, hence the lack of updates this month. Rather than let the new code go to waste I have applied it to Decade too see the results. Here is a normal screen shot of Decade


and here is Decade as an Oil Painting.

I am happy with the results, although now a little unsatisfied that the manipulation is not real time. I'm not sure of the possibility of writing a Pixel Script to do this in real time because it requires sampling multiple pixels in order to create the smudged Oil Paint effect. Despite this I still plan to at least try and implement an Oil Painting script sometime. It would be nice to make a game where it appears that the whole world is painted, and perhaps the levels of the game could be based on classic painting by Da Vinci, Picasso etc.


I have also been working on Atmospheric Scattering this month but because of my other commitments have not yet fully integrated with Decade. I will try and get a video update soon to at least give a taster of my progress.

The other day I found a shortcut to my old website. It has been almost 3 years since it was updated. Hosted on an Irish telecoms provider, I do not seem to be able login to my account from outside Ireland so it has remained static since I left. It has some fond memories for me. This was my start in game programming as a hobby. The host where my game demos were stored is no longer active so you cannot download anything. If you would like to try anything leave a comment and let me know. I will then find the game in my archive and upload it.

Monday, September 24, 2007

Underwater Caustics

Caustics are defined as "The light patterns generated on a surface by reflected or refracted light rays." Imaging that you are in a swimming pool and swimming beneath the water. The sides of the pool are not evenly lit. As the light enters through the surface of the water it is refracted and causes areas of shadow to appear on any surface beneath the water line.


This implementation of caustics is physically fake. I do not represent light beams entering and refracting on the water surface. This effect is achieved by tiling a sequence of textures on the terrain for the area under the surface of the water.


Sequence of textures which are tiled over the terrain

This does require the graphics card to support a 3rd texture unit. If you remember from previous blog entries, the terrain already requires 2 texture units, 1 for the terrain texture and 1 for the detail map to add more realism to the scene. From some quick research it looks as though most modern graphics cards support at least 4 texture units so this should not be a problem.


Saturday, September 22, 2007

Water Comparison

With both my planned implementations of water nearing completion it seemed appropriate to run some comparisons.

CPUWater was coded so that Decade could render a terrain with water on PCs which do not support the relevant OpenGL Extensions required for GPUWater. Decade will automatically detect which it can use.

The main surprise to come from running this comparison is non technical. After a few friends and programming peers viewed my comparison video (below) approximately 80% if them commented on how good CPUWater looked and that they thought it looked more realistic than GPUWater.

Scene Rendered with CPU Water

Scene Rendered with GPU Water


The main reason for this is because CPU water moves. Its height at each point varies depending on the tessellation of the mesh therefore it looks like waves lapping the shore. Since GPU water is comprised on only 1 quad and the waves are simulated using bump mapping the shore line is static.

Perhaps I should write a CPUGPUWater. The water will comprise of a tessellating mesh like CPU water, but it will be rendered using bump mapping like GPU water. This might achieve a nice result of having water which moves naturally however also appears to be highly tessellated despite its low poly count.

Friday, September 21, 2007

GPU Water

My second attempt at water rendering uses a vertex/pixel shader along with normal and dudv map's. Using the normal and dudv map's along with the reflection texture, which is dynamically generated each frame, the final effect is achieved.


The image above is the normal map. Instead of using each pixel for a color, the nomal map stores a normal (between -1 and 1). The normals naturally give the image a purple, pink and blue color. What we do with this image is basically use it to bump map our water to give it the appearance of being highly tessellated and realistic. This realism comes when we use per-pixel lighting on the water. If we didn't have a normal map we would just depend on the normal of the water surface, which is pointing straight up, the water would look like a flat mirror.


The image above is the dudv map. It is called that because it's actually the derivative of a normal map. In mathematics the notation for a derivative is du/dv. What this texture does is give us a way to calculate refraction and how the light will react and bend on the water. Notice how the dudv map looks like waves of water.


The image above is the reflection texture. This is caculated each frame by inverting the scene, setting up a clipping plane and rendering the reflective data. Projective texture mapping is then used to apply this texture to the water.


Although I am happy with this implementation there are a few changes that need to be made. Memories of my first implementation of CPU water are coming back. My lake again looks like a mirror. It is too bright and too reflective. It should be possible to see some way under the surface of the water. I have tried to implement the simple changes which were required by CPU water, after I changed to using a reflection texture rather than drawing the inverted scene to the screen, however there is no differnce. Adding Alpha Blending with a fixed function does not seem to make any difference when the pixel shader is used. If I remove the shader from the rendering, a correct flat blue alpha blended quad is rendered. Since the GPU water is effected by per pixel lighting prehaps I need to modify the pixel shader in some way. I have read a few tutorials on OpenGL shaders, however I feel that I need to complete a few more before I have the confidence to say for sure.


Wednesday, September 19, 2007

CPU Water

As all can see its been a while since I updated the blog so yesterday I recorded a small video of decade. You can now see the engine in motion rather than just static screenshots.

Unfortunately YouTube has really lowered the quality of the video when it was uploaded but it should still give a rough idea about Decade.

The video shows a simple terrain with random trees and my CPU water with vertex projected reflections.


Other features that I am still working on are

GPU Water
Shadow Maps, Parallel Split Shadow Maps, Shadow Volumes
Atmopheric Scattering
Priority Rendering Queue
Octree
Scriptable Particle System

Friday, August 24, 2007

Random Issues

Not a list of random issues, as the name suggests, but an issue with Random Number Generation. Both my procedural terrain generation techniques (Fault Formation and Midpoint Displacement) use pseudo random numbers. The other day when comparing Decade with Decade.NET it was quiet obvious that 2 very different terrains were built even though the same seed and procedural algorithms were used.

Creating 2 basic programs, 1 in C++ and another in C#, I generated 10 random numbers using the seed '12345'. The C++ program generated "7584-19164-25795-22125-5828-23405-27477-5413-29072-23404" while the C# program generated "143337951-150666398-1663795458-1097663221-1912597933-1776631026-356393799-1580828476-558810388-1086637143". I then limited the C# number generation to be between 0 and RAND_MAX (32767) as the C++ rand() function does, but the results were still incorrect with "2187-2298-25386-46748-26131-27108-5437-24120-8526-16580" being generated.

The easiest way to over come this has been to create a Managed C++ DLL with members to seed and create random numbers. This DLL is added as a reference to Decade.NET and it is used to get a random number rather than the Random object. Now both Decade and Decade.NET produce the same random numbers for a given seed any procedural work based on random numbers will match.

Monday, August 20, 2007

Resistance is Futile

It may not be futile, but it is very difficult to resist coding new features when some maintenance needs to be done on what has already been developed. The desire to implement the next big thing is tempting. However I have thus far succeeded in doing what I believe needs to be done in order to improve decade as it exists already.

Friends have told me that premature optimizations are the death of many projects; however I don’t feel that what I am doing now is really optimising. This has always been a learning project, not exactly made up as I went along, but that does have an element of truth. It was best implemented at the time based on what I knew, and through experience learned from my implementation, experimenting and reading I now see there are better and faster ways to do things. Further developments also rely on these better ways of doing the basic things therefore it is important that they are implemented now. e.g. Water will rely on geomipmapped terrain to

A) Reduce the Number of water polygons rendered and
B) Reduce the number of water vertices updated and projected to screen

Improvements made this week are....

Use triangle strips rather than triangle lists when rendering Terrain/Water patches.
I have been told in a forum that the more information passed to the GC (Graphics Card) the faster it can render so therefore triangle lists are the best for performance. I cannot find any information to back this up so I will test for myself, but I find it difficult to believe that this is true. Consider the amount of information that needs to be passed each frame....

Patch Size = 17
Triangle List would have 1734 Indices for Patch of highest LOD
Triangle Strip would have 644 Indices for Patch of highest LOD

and presume there are 1000 patches rendered a frame (in a 1024*1024 terrain there would be 3721 Patches) there is a huge difference in the amount of index data sent to the GC. 1764000 as opposed to 644000. Decade supports lists and strips for terrain patch rendering so I will at some stage benchmark the performance of both.


Remove Terrain Cracks.
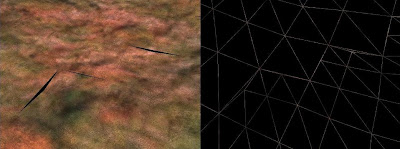
In terrains which support Level of Details (LOD) artefact's called cracks can appear. These can caused when a terrain patch has another terrain patch with a lower LOD as its neighbour. In the image below you can see the cracks in the distance. I have removed the skybox because the black background highlights the cracks.


Below you can see an up-close image of the cracks. In reality it would not be possible to see a crack this close because as stated it is when a patch neighbours a patch with lower LOD, and that will always occur in the distance. The wire frame image should make it more apparent why these artefact's occur.


There are 2 methods to remove the crack. The 1st is "Vertex Insertion" into the patch with the lower LOD. This is not a difficult task; however it is the more complex of the 2 methods so we will ignore it. The 2nd and preferred method is "Vertex Removal" from the patch with the higher LOD. Decade presumes that a patch can only neighbour a patch with an LOD that is the same as its own, or has a difference of 1. (i.e. 1 Level Greater than or less than its own). With this being the case, to remove a vertex from a patch we simply navigate the index buffer to the indices relating to the side of the patch in the direction of its neighbour (North, South, East or West) and remove every 2nd index. And to make it even more simple, we don’t even have to "remove" the index. By setting the index equal to the next index in the array we visually remove the vertex from the patch, however it is still theoretically present, but rendered as a degenerate triangle (a triangle which has 2 vertices the same, hence no area) and apparently OpenGL and DX can recognise degenerate triangles and do not even send them to the GC.


To further improve the speed of Decade, all this is pre-calculated. For every LOD which the terrain supports 16 index buffers are created.

00 None Lower
01 West Lower
02 East Lower
03 East-West Lower
04 South Lower
05 South-West Lower
06 South-East Lower
07 South-East-West Lower
08 North Lower
09 North-West Lower
10 North-East Lower
11 North-East-West Lower
12 North-South Lower
13 North-South-West Lower
14 North-South-East Lower
15 North-South-East-West Lower

and during run time the correct index buffer is selected and applied to the associated vertex buffer. Many tutorials I have seen update the index information at run-time however I think this is unreasonable for high performance in a large terrain. In Decade a Nibble (Half a Byte) is used in order to select the required index buffer.

1000 = North Patch is Lower LOD
0100 = South Patch is Lower LOD
0010 = East Patch is Lower LOD
0001 = West Patch is Lower LOD

So the pseudo code for selecting the correct index buffer to use would be

byte IndexBuffer = 0x00;
if North Neighbour's LOD LessThan This Patch's LOD
IndexBuffer = IndexBuffer XOR 8 (1000 in Binary)
if South Neighbour's LOD LessThan This Patch's LOD
IndexBuffer = IndexBuffer XOR 4 (0100 in Binary)
if East Neighbour's LOD LessThan This Patch's LOD
IndexBuffer = IndexBuffer XOR 2 (0010 in Binary)
if West Neighbour's LOD LessThan This Patch's LOD
IndexBuffer = IndexBuffer XOR 1 (0001 in Binary)

For example presume that we had a Patch which had the following Neighbours. North and West = Same LOD as the Patch, South and East has a Lower LOD. Running through the above code we would hit the lines

IndexBuffer = 0x00;
IndexBuffer = IndexBuffer XOR 4
IndexBuffer = IndexBuffer XOR 2

which gives us IndexBuffer of 0110 or 6. Referencing the above array we see that index 6 provides the Index Buffer for a Patch with South and East having lower LOD's which is exactly what we required.

This has been my first attempt to make my posts a Little more technical. I hope I succeeded in explaining how I was achieving certain behaviour in Decade. I would be delighted to hear your questions or comments.

Thursday, August 09, 2007

Vertex Projected Reflections

A new implementation was required in order to achieve better looking software water. It is slightly more complicated, a little more CPU expensive but I feel the results are allot more appealing and worth it. No hardware acceleration was used so this should hopefully work on any computer.

The differences are:

Previous
  • Invert the scene so that it is upside down
  • Setup the clipping plane so that only vertices above the water (those that will be reflected) are drawn
  • Draw the scene
  • Disable the clipping plane
  • Render scene as normal

Now

  • Invert the scene so that it is upside down
  • Setup the clipping plane so that only vertices above the water (those that will be reflected) are drawn
  • Render the scene to a texture to be used when rendering the water
  • Project each of the water vertices to screen coordinates. Set these values as water texture coordinates
  • Render scene as normal


Further optimizations are to be added for the water. Use a terrain approach to render the water by splitting it into patches and rendering with a level of detail therefore reducing the polygons drawn in the distance. As well as reducing the number of polygons rendered I should be able equally cut the number of water vertices updated and projected to screen.


I have just looked through this blog and feel a little dubious about it. I guess the first question is does anyone read it? If so can you let me know. I am going to update it as often as required regardless because it is a nice timeline of the Decade Engine for me, however if people read it and would like to learn something from it please let me know. I can start to make the posts more technical with sample source, comparisons etc... In essence start to build up a 3D engine tutorial.

Sunday, August 05, 2007

Reflections

I find it hard to believe that its been almost a month since I last posted. I guess there just hasn't been much new to show since then, as I was converting Decade to Decade.NET. Progress is slow due to a busy life but its now almost there.

Today, for a change (which they say is as good as a break) I decided to implement reflections. A second render pass was needed. 1 to draw a clipped upside down scene which is used for the reflection and then the normal scene.


Unfortunately these images as usual do not do Decade justice. The water looks like a sheet of glass, however in Real Time with the water moving and light reflecting realism is better. I think I will finish software water soon and then add DUDV maps for hardware rendered water.


Friday, July 06, 2007

C++ to C#

I have written many programs in C++ and many in C# before but this is the first time I have tried to convert a full C++ program in C#. Since both languages have a very similar structure and share allot in common I thought this would be a simple matter but I was very wrong.

Its by no means an impossible task, however the small but significant differences require some rethinking and restructuring of Decade. (Managed Code, stronger typecasting, delegates etc...) I have allot of the core graphics components complete and am now on the File Parsers. It has taken a short while to get a grasp of Regex instead of using sscanf and such functions, but now progress is moving again. Hopefully by next week I will have some screenshots from Decade.NET.

Sunday, July 01, 2007

Panorama

As conversion continues, and there isn't really anything new to show, I thought I would upload these these test images. They show randomly generated scenes in Decade (hence why there are trees growing in the water) in panorama form,


Tuesday, June 26, 2007

June is almost over already!

July has been a quiet month with posts, however development continues. Holidays. Being busy at work. Having custom work to complete outside work etc.... the month has just disappeared.

Deciding that my own custom GUI components wasn't the best way to spend my time, I started development on Decade in C# using Tao for OpenGL. Development is slow but steady. I am currently adding in the file parsers for the 3D file formats and then terrain loaders/generators. With this complete it will be on par with Decade and I can begin working on my Sandbox Editors.

There are no screenshots to show, because I am using the same media as Decade and the screenshots look identical. Hopefully I will get some more spare time soon and can get the rest of the current in development work completed.

Thursday, June 07, 2007

Decade .NET

For the past number of days I have been contemplating moving Decade to .NET. Programming the GUI Interface has raised this issue. I am currently spending allot of time programming a GUI System so that I can make Level Editors and a range of other tools for Decade.

Drawing and managing the controls myself was inspired by Unreal Tournament, however my results are nothing like this. I don't have the artwork or the time to match these results. In truth my rendered buttons do not look much different to those I created almost 10 years ago when making simple Mode13h Dos Games. In short, with this method I am spending allot of time with little gain and not really learning anything.

Another possibility would be to make the GUI in WIN32, therefore keep the engine as C++. This would save time in now requiring me to rewrite the engine, however I find GUI work in WIN32 to be hideous.

Although requiring the most work and the most time, I think that converting Decade to C# is the best course of action. With this I get to refresh my C#, learn some more .NET and have a nice and simple way to create good Gui's for my tools. To help me with this I have found The Tao Framework. This will help allot in using OpenGL with C#.

If anyone has any comments or ideas on this plan I would like to hear them.

Thanks

Monday, June 04, 2007

Update

Decade Engine is still alive. It has been about 10 days since I worked on it. Last week I had holidays and I also got a new acoustic guitar so was distracted from programming for a short while. In the few hours that I did work on the engine focus was on making GUI Components and the GUI Manager. I hope that buttons, combo boxes, list boxes, edit boxes etc... will all be supported soon and I can start work on mesh and level editors.

Hopefully I will have some screenshots soon, but so far development in this area has been allot of functional stuff so nothing nice to show.

Wednesday, May 23, 2007

Let there be Light

Basic lighting has been added to Decade. This adds another slight layer of realism to the scene. In my opinion the screenshot below does not do Decade Justice. The moving water being effected by light and shade creates an impressive effect. I have tried to create a video to upload to YouTube so I can show here but so far the quality hasn't been worth showing.


Patch Culling and Node Tree has been added to Brute Force Terrain. This now exceeds the frame rate of software rendered Geomipmapping, however Geomipping will soon be Hardware Rendered too and will hopefully increase in frame rate.
Other in progress work are Scriptable Particle Systems and GUI Components such as buttons, combo boxes etc...

Friday, May 18, 2007

Software Water

Although I hope that some day Decade is a high end 3D engine supporting the most advanced technologies and rendering techniques, at present I want to make sure that almost anyone can play my games.


My full blown water will be rendered using Bump Maps and Stencil Reflections, which not all Graphics Cards support therefore I have first implemented a simple alpha blended tessellating mesh with a sphere mapped texture. Results are not very realistic however give the impression of water with semi-realistic movement.


In Wire frame one can see the mesh clearly. As the water mesh is constantly moving and is alpha blended it does not have to be as high a resolution as the terrain. The terrain is the images shown is 512x512 whereas the water mesh is only 60x60.

Wednesday, May 16, 2007

Multiple View Ports

To take a little break from terrain programming I decided to try something else last night. While watching a Formula 1 Grand Prix over the weekend it reminded me of playing racing games and being able to turn on or off the rear view. Having always wanted to implement this I decided that now was the time.

I was amazed at how easy it is in OpenGL to achieve multiple view ports. After 10 minutes of reading an online document I realised that I already had all the code from my OpenGL setup functions so only a little reorganisation was required.


Decade can now support 1 t0 X view ports (I haven't tested an upper limit) and each view port is independently controlled, updated and rendered. They can share scene data or use entirely separate data.

Uses for this within my plans for Decade are currently limited. It was implemented for my enjoyment rather than for a real need, however it should become useful for rear view when in a car, split screen multiple players etc..

Saturday, May 12, 2007

The Sky's the Limit

Sky Boxes have been added to Decade, and as a friend has commented they give the scene atmosphere in more than 1 sense. The sky boxes used were taken from Hazel Whorley who offers his creations free for use in non-commercial projects. They are some of the best free sky box textures I have ever seen.

I will use sky boxes for a while with Decade however I want to soon implement sky domes. They have many advantages over sky boxes. Due to the cube nature of the sky box it is very difficult to animate the sky without the cube structure becoming obvious to the user. The dome removes this and will allow me to set the time of day and add procedural clouds.


Thursday, May 10, 2007

Erosion Filters

Having put the issue raised in blog entry If a man owns land, the land owns him on the to "Fix It Later" pile I continued development of Decade. All my documented issues are always on my mind as I research and develop, so yesterday while searching through random Terrain documents I found a Box Filtering Height Maps for Smooth Rolling Hills tutorial and immediately thought it might be useful. Even though I am not always going to want to have rolling hills I thought that such a method might enable me store the terrain in its original 1 or 2 byte format instead of using 4 byte floats.

Terrain with height values stored in 1 byte

Terrain with height values stored in 4 bytes

Terrain with height values stored in 1 byte and modified with Erosion Filter of Box Size 3 and 1 Iteration

As you can see, running the Erosion Filter on the terrain greatly improves the quality of the 1 byte height field. (When I say 1 byte height field I mean that the data in the .raw file was stored in bytes. The height field is still stored in 4 bytes (float) within Decade). There is a little loss of detail compared to the 4 byte terrain however depending on the game and environment this may be acceptable.

Terrain with height values stored in 1 byte and modified with Erosion Filter of Box Size 11 and 5 Iteration

Care has to be taken when using the Erosion Filter. As you can see above running with too large a box size over many iterations starts to remove allot of the detail from the terrain resulting in a flowing rolling landscape. Again, this may be desirable in certain instances and not in others.

What this has thought me is that there is no right answer to the question I am asking. It all depends on personal preference and the requirements of the game at that time. To accommodate this I am going to allow a broad range of options. My custom height map file will be modified to allow the user specify how the data is stored.

Currently the simple file type is
Width (2 Bytes)
Length (2 Bytes)
Data (Width * Length * 4 Bytes)

so by adding in a type field the user can save and load as they desire

Width (2 Bytes)
Length ( 2 Bytes)
Type (1 Byte)
Data( Width * Length * Type Bytes)

I hope that this,along with the box and any other Erosion Filters added later, will allow Decade deal with a large variety of requirements when rendering/storing its terrain.

Wednesday, May 09, 2007

A little forrest.

As I mentioned in a previous post, I really wanted to add trees and other vegetation to my terrain engine. I believed that this would greatly add to the atmosphere. My first desire was to create all these trees and plants procedurally. After searching online for a while I found a few good tutorials on how to achieve this but have decided to place that idea on hold for a while. Eventually I would love to do this. It would be great to have procedural plants on a procedural planet in a procedural solar system within a procedural universe. :)

For now I have decided to use mesh's for the plants. Again, rather than waste my time trying to model them myself or look for appropriate free models online (any I found either looked wrong or were to complicated) I choose to purchase the tree packs from Loopix These are decent quality, low poly trees which are ideal for my needs.


Currently a small selection of the available trees are just placed at random on the terrain. Already I think they add a whole new feeling to the demo.


Friday, May 04, 2007

Procedural Texture Mapping

Decade can now generate its terrain textures procedurally. This is a big step as each terrain created automatically gets textured based on its unique attributes. Instead of just showing you a screenshot I will briefly explain how the textures are created.

A set of base textures is gathered. These are plain textures of all the environments which will exist in the terrain. e.g. sand, grass, rock, mud, snow etc...


Each of these environments is given
  • optimum height (The best height at which this environment exists)
  • min height (The minimum height at which this environment exists)
  • max height (The maximum height at which this environment exists)


By cross referencing these values with the height map, the textures assigned to each terrain which exits at the given height are blended together with higher preference going to the more optimal terrain.

The result is the above texture which is then applied to the terrain. For my first implementation of this algorithm I am happy with the results, however as always there are many improvements which need to be added.

  • Tiling textures instead of stretching them
  • Add support for applying the detail texture to the terrain texture at this stage to cards which do not support multi-texture can still have detail at no extra cost.
  • Some better logic for texture blending instead of just checking the height. The environment in a valley is different to that of a cliff face at the same height, or rocky outcrops on a snow covered mountain etc...
  • Add lighting so that features are enhanced.
  • Add vegetation to add more realism.


Monday, April 30, 2007

Bitter Sweet Success

Having quickly modified Decade, to store saved/generated terrains using floating point values rather than unsigned chars, I am happy and disappointed with the result.


As you can see above the smoother gradient makes the terrain looks allot more natural. It has been commented that the staired terrain looks cool, like contour farming, and perhaps it does in unique circumstances but it will not work for the terrain in general. Despite this success the loading/saving time and file size has been affected even more than predicted. Huge Height Map files and long loading times are not acceptable.

Some more research needs to be done for terrain storing and loading. Different possibilities which instantly come to mind which may or may not work are

  • Split the terrain over many files and load the segments coming into view on another thread
  • Store the terrain in the original .raw file and use some logic to smooth the vertices's

If a man owns land, the land owns him - Ralph Waldo Emerson

Just back from a weekend break in London so I did not program for the past few days. Coming home yesterday we were delayed in the train station for 7 hours so while sitting around I had plenty of time to think about what I wanted to achieve with the terrain segment of the Decade Engine. Here are some improvements. (I know I said in my last post that I was just going to add Vertex Arrays and VBO's but after some consideration I believe that the following additions are also required.)

1) Change from using a .raw file to using my own custom format. The .raw file used 1 byte for each value. This limits the range of values from 0 to 255 and only whole numbers are included. I didn't notice any issue with this when I was rendering small terrains (up to 512x512) however now that much larger terrains are being rendered 8192x8192 (134,217,728 faces) a very undesirable stair case effect is emerging. Take a look at the attached screenshots. As the values of the terrain are rounded the terrain grows in increments making it look unnatural. I am going to create my own file format which will use floats instead of unsigned chars. This has the advantage of being correctly able represent the terrain however will result in a larger file size and a longer read/write time for the file. I believe the advantage greatly outweighs the problems.

Stepped Terrain caused by .raw file data storage

2) Now that larger terrains are being rendered some more intelligent culling of patches is required. Simply checking if each patch is visible to the camera (by checking collision with the viewing frustum) is not enough. The mentioned 8192x8192 terrain segment is made up of 232,324 patches. With the current implementation this results in 232,324 frustum checks per frame. By adding a simple node tree most of these checks can be bypassed.

A node tree is a method of subdividing the mesh (terrain in this instance) into smaller sections. For instance, with the terrain I would divide it horizontally and vertically through the centre resulting in 4 segments, top right, top left, bottom right and bottom left. These segments would then be recursively divided until the required tree depth is reached. When doing frustum checks the terrain algorithm would first check collision with the node tree. If the Top Right Segment (or any other segment) was not visible by the frustum all of its children could immediately be ignored as not visible. If the Tree Node is visible by the frustum each of its children would be checked etc..etc... I expect that this will give a huge performance increase when used with large terrains for both geomipmapped and brute force terrains.

Stepped Terrain caused by .raw file data storage

3) Add support for Vertex Arrays and VBO's in geomipmapped terrains.

Friday, April 27, 2007

Patch Culling

Brute Force Terrain. 32258 Polygons Rendered

As a further addition to the Geomipmapped terrain I have added Patch Culling.

In my original implementation of Geomipmapping the distance from the camera to the terrain patch was calculated and from this the level of detail deciphered. If you remember your maths from school you will know that getting the distance between two points always returns a number which is greater than or equal to zero. Because of this no spatial relation between the objects is known so we still rendered patches which were out of view of the camera, although at its correct Level of Detail.


Geomipmapping with no Patch Culling. 5757 Polygons Rendered

With Patch Culling we simply check if the current patch is inside the Fustrum of the Camera. A fustrum is like a pyramid on its side, the pointy part at the lens of the camera extending out into the world. By doing some simple plane tests we can quickly and easily see if a point is inside this pyramid and therefore immediately ignore it if it is not. This does not only help us ignore faces to render, but we can also ignore patches to update so is useful for the GPU and the CPU.


Geomipmapping with Patch Culling. 2192 Polygons Rendered

The final addition to my Geomipmapped Terrain (for now) is to add support for Vertex Arrays and VBO's. I hope that this will increase the fps but it will also keep the render code separate from the terrain code therefore keep me on track for an engine which should be easier to update to DX.

Tuesday, April 24, 2007

Geomipmapping

Geomipmapping my first implementation of a CLOD algorithm, is working in its most basic form. The images below show the different outputs from the algorithms. To render a segment of terrain which is 128x128 Brute Force renders 32510 faces while Geomipmapping only has to render 1240 in this instance (this varies depending on camera position).

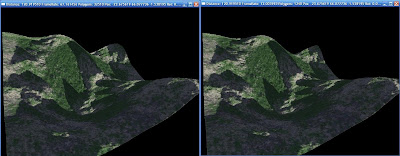
Brute Force and Geomipmapped Terrains Rendered in Wire Frame

Brute Force and Geomipmapped Terrains. (Very little visual difference)

Even at this stage I am happy with the frame rate increase. In the images shown you can see that Geomipmapping achieves 72fps whereas Brute Force gets 67.7fps. This may not seem like much of an increase but please remember how the Brute Force vertices are stored and rendered. VBO (Vertex Buffer Objects) are used therefore the vertices are stored and rendered by the Graphics Card. My Geomipmapping implementation currently renders all faces with individual software calls. If I do the same for Brute Force for the selected terrain its fps drops to about 54.


By implementing Vertex Arrays or VBO's for Geomipmapping, which is also maintain my desire of keeping the algorithms and graphics API calls separate, I expect to see a frame increase. Also by adding Frustum Culling on each of the terrain patches in the Geo terrain I can further reduce the number of vertices to be rendered.